The Tower of Doom can be played for Homework, and Solo. It is like Dungeons except it's played with cards. The game is simple: You have to have a higher Strength, Wisdom, Or Charisma, in order to damage the enemy. Each enemy has its own tricks to be careful of who you face up with. Whenever you answer a question correctly, you get to choose the attribute, however...if you get it wrong, the AI will choose the attribute and it could end up bad . You start off with questions, when you answer them correctly, you get to pick one card out of the three, choose very wisely when choosing a three for one. once you get a few cards, you will be set up with a map. The map tell you all the icons and everything, and make sure you pick the right path or else you might just get unlucky and lose! You can also obtain coins for defeating a enemy or Boss or Mini-Boss.
What are Icons you say?
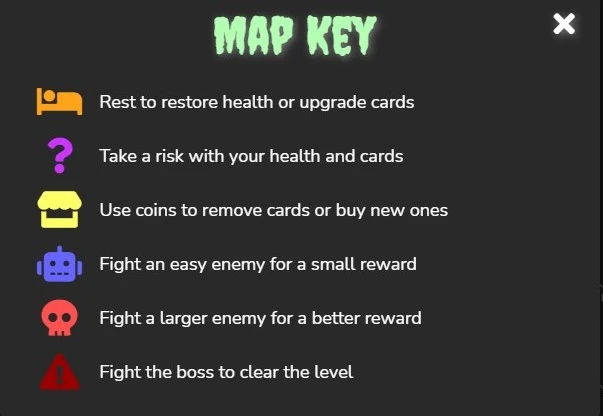
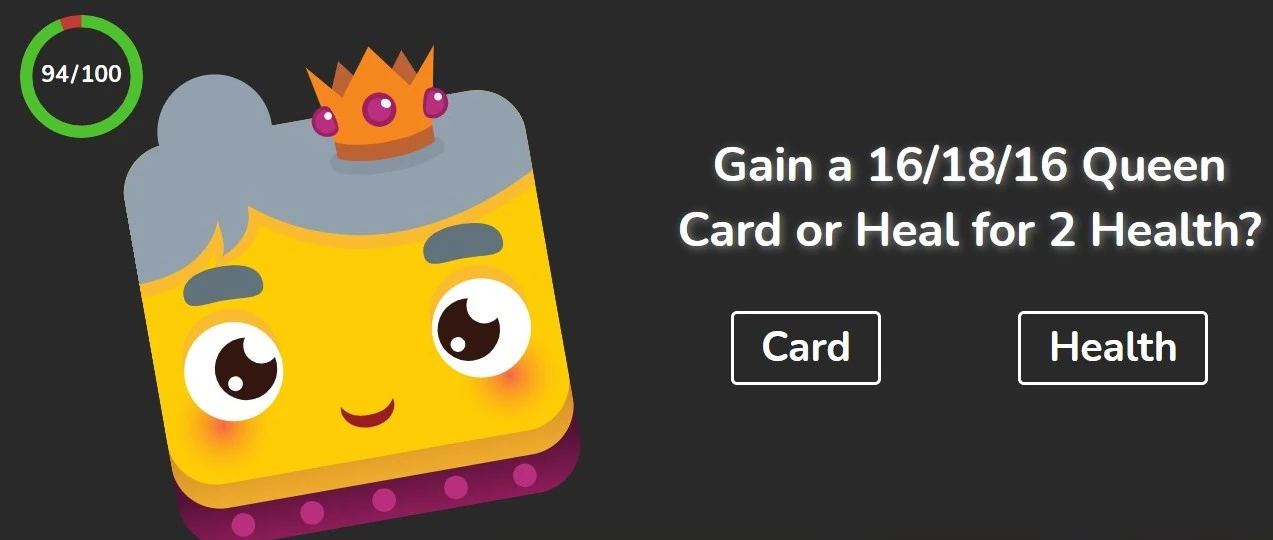
They are special keys that tell you what they are. The first and obvious Icon, the robot. The robot Icon indicates you that it's a enemy your facing with. No stronger than a Mini-Boss or a Boss. Just a Minion. The second Icon is the Skull. The Skull indicates you that you are fighting a Mini-Boss, a Mini-Boss is sort of a boss but you get double the rewards from it. The next Icon is the Store. Like all classic dungeon, you always need a store to buy and use your coins to buy powerful stuff. Just like in The Tower of Doom, you use coins to buy power-ups (power-ups will be explained later) and to buy powerful cards with different rarities (will be explained later). The next Icon, The Sleeping bed. This stage is basically a resting stage where you have to answer 3 questions correctly in order to rest. However, you do the exact opposite, you will skip the resting stage. If you answer them correctly, you get 2 options, either heal your health to survive longer or add 2 more attributes to your cards (you can use them with only one card not multiple). The next card is the Question mark. This is self-explanatory. You either have a 50-50 chance of having a good luck or bad luck. If you Get a good one, you get to pick a OP, basically has buffed stats than a usual card, card or regain health. However, if you get the exact opposite...you will either have to get a very weak card, or sacrifice a lot of Health. The only advice I should give you is to not go there. The last Icon is The Boss warning sign. There is nothing I could say much because its self-explanatory. It just indicates you that a your about to fight a boss. That's all for the Icons. If you want more information, just go to the next source underneath this source.
Encounters
A map key
Positive Risk Interface

Starter map 4 choices.


Shop Prompt when you're too broke to afford something.


Battle interface

Shop Interface
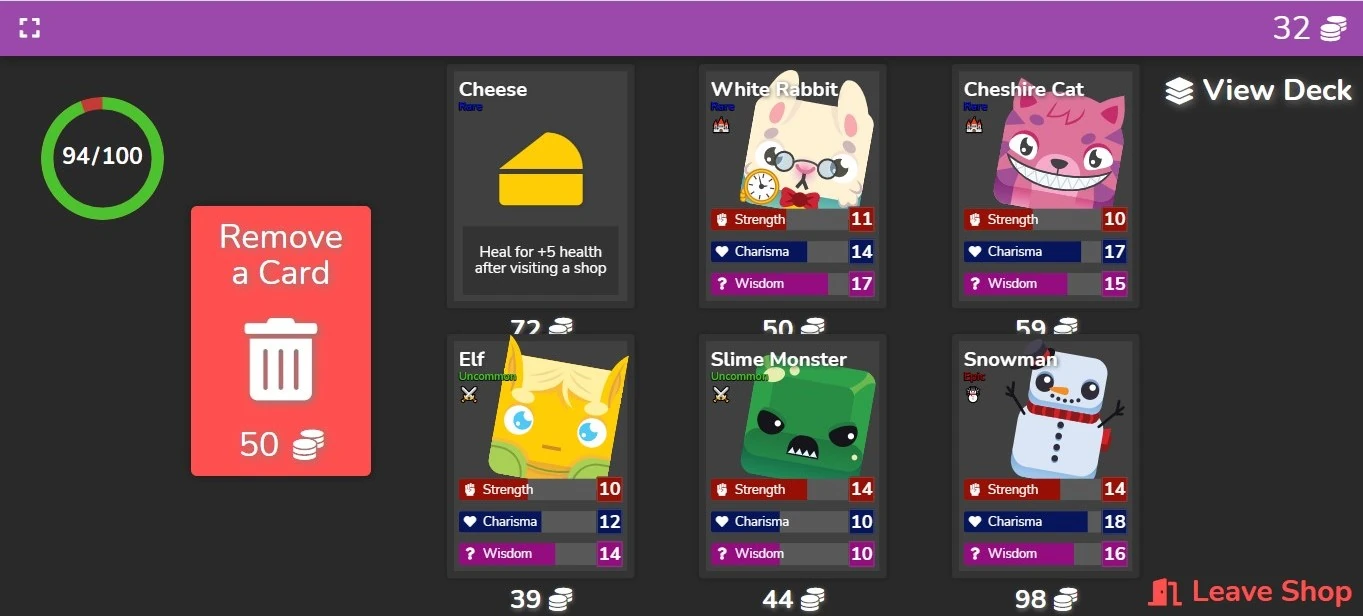
So, in TOD you have to battle. However, it's not only about battling. There are things called encounters which define the game. What's an encounter? When you first start, AFTER you pick your starter cards you get to choose out of 4-6 "Encounters." (check image for details.) So what do they do? Well, the icons with 👾 are easy fights, the icons with 💀 are the harder fights, the icons with an orange shop icon are well shops, the icons with 🛌 are rest stations, and last but not least, the icons with ⚠ are boss battles. So what do each of them do? Well, the easy fights are enemies with around 20-60 health (depending on the level). They drop bad items, and only around 15-30 coins (depending on the level). Now the harder fights give you better stuff, and they also give you more coins. Now let's talk about the passive encounters before we talk about bosses. The shops have spells and blooks in them. Okay, but they also have something called an item remover (just a trash can, see image 2 for details.) And with these item removers you can remove an item. The default cost is 50 coins. Well why would you want to remove an item? Because, its not that having the most cards gets you a victory. You need to get the BEST ATTRIBUTES! With this item remover, you can remove as many items you like as long as you have enough rubies. If you don't, come back when you're a little, ehhh RICHER. And it's good because you always have that Capuchin or Arctic Hare that you don't want. Now onto the rest stages. In rest stages you have 2 options. Restore health... or buff a card. So how it works is, you have to answer 3 questions correctly and if you do, you can rest. How many attributes do you upgrade, can I do it to multiple blooks, how much are they buffed? You choose 1 blook. It upgrades all the attributes on that ONE BLOOK by +2. You can upgrade that blook as many times as you want, just not at the same rest station. Last but not least, we're going to talk about the boss battles. In the boss battles you face a very strong boss. Level 1 is the Evil Unicorn with 70 Health. Level 2 is the Evil Santa with 100 health. Level 3 is the Evil King with 150 health. Well, if you end up beating one of these bosses you'll be greeted with riches. Level 1 you get around 70-100 coins (without any piggy banks), and a choice between rare-legendary artifacts/blooks. Level 2 you get 100-150 coins, and very good artifact/blook choices. Now then, Level 3 is different. If you get a good game and end up killing the Evil King you get something special. What you get is a victory! You get to post a message on the victory wall and see other players victory messages. Afterwards you will be rewarded with your Blooket Tokens for that game. (See images for any questions)
What are the card rarities?
Card rarities depend on the enemies you fight, like Bosses or Mini-Bosses, they give you a higher chance to get more rare cards to help you in battle. This also goes with the shops. There are many rarities usually, like, Common, Uncommon, Rare, Epic, and last but not least, Legendary. Each Blook has its own power, whether it has high charisma or high strength, or high wisdom. Each Blook has its own Characteristics. The attributes depend on what the AI/Computer chooses, its not like, "the AI bought that thing from the shop", no, its always random, however the bosses are not random, they always have the same cards, even if you refresh the page. And when I mean they have the same cards I don't mean they are all have the same cards like one boss has a chick then the rest should have a chick no, the computer AI that made the cards will always stay the same no matter what.
Glitches
The bugs/glitches in game are:
- The shop refresh glitch*
- Free health glitch
- 20/20/20 - (big stats) Cards glitch
- Infinite victory wall posts glitch*
- Attribute Card Reader
- X-ray glitch
- Level retry glitch
*Note: These glitches have been patched, and are currently unusable.
- *This glitch has been patched.* For the shop refresh glitch you need to go into a shop, click the back arrow (⬅), and then the forward arrow(➡). Doing this will result in a new shop, and you will keep purchases from the last shop.
- For the free health glitch, you need to get a Lucky Feather and go to a ? (risk stage). Then if its good, it should be good, you need to turn your wifi off on YOUR COMPUTER, NOT THE ROUTER. Then, you need to spam the "Gain Health" button.
- For the big stats glitch you do something similar, except instead of spamming click on the "Gain Health" button, you have to spam on the "Gain Card" button.
- *This glitch has been patched.* For the infinite victory wall post glitch, you need to do the same thing as the shop refresh glitch. Once you defeat the evil king you can post your message, but instead of clicking end game, hit the back arrow and then the forward arrow. This will cause it to say that you can post again and the victory wall will also be updated if anyone posted after you posted.
- For the X-Ray glitch, after a turn, before the next turn, you minimize the window you are playing in, wait about 3 to 5 seconds, and re-open it. There is a chance that you will be able to see the enemy's card and attributes for a second.
- For the Level retry glitch, go to a level, and then close the tab. Reopen tower of doom, and load the save file you were using, and you can do the level again. it is helpful if you fail a rest stage, or want to max out your cards. WARNING: this glitch will not work unless you refresh the page, and/or you don't go to the map!
Cards
The cards in TOD. These include Blooks, and Artifacts. The Artifacts are cards that do not count as Blooks yet help you in the game- They range far from heals to multipliers. The following is a list of the Blooks, and 'Spells'.
Blook Cards:
- Arctic Hare
Artifact Cards:
Heals:
Buffs:
Multipliers:
Damage Related:
Miscellaneous:
Advanced
When looking into the script for tower of doom you are able to see what deck each evil blook uses, and what it's max health is.
{Chicken:{maxLife:25,deckBlooks:["Chick","Chick","Chicken","Chicken","Duck","Duck","Cow","Pig","Jester","Cheshire Cat"]},Pig:{maxLife:40,deckBlooks:["Pig","Pig","Cow","Cow","Goat","Walrus","Sheep","Horse","Slime Monster","Dormouse"]},Dog:{maxLife:28,deckBlooks:["Dog","Dog","Puppy","Puppy","Bear","Goldfish","Turtle","Moose","Walrus","Gingerbread Man","Eat Me","Two of Spades"]},Cat:{maxLife:30,deckBlooks:["Cat","Cat","Kitten","Kitten","Rabbit","Hamster","Turtle","Tiger","Panther","Unicorn","Cheshire Cat"]},Bear:{maxLife:43,deckBlooks:["Bear","Bear","Polar Bear","Penguin","Orangutan","Moose","Fox","Tiger","Dragon","Queen of Hearts"]},Raccoon:{maxLife:27,deckBlooks:["Raccoon","Raccoon","Raccoon","Fox","Squirrel","Owl","Hedgehog","Anaconda","Goldfish","Jester","Cheshire Cat"]},Tiger:{maxLife:33,deckBlooks:["Tiger","Tiger","Orangutan","Panther","Jaguar","Toucan","Macaw","Horse","Walrus","Queen of Hearts"]},Parrot:{maxLife:32,deckBlooks:["Parrot","Parrot","Macaw","Toucan","Cockatoo","Cockatoo","Owl","Snowy Owl","Tiger","Wizard","Mad Hatter"]},"Arctic Fox":{maxLife:30,deckBlooks:["Arctic Fox","Arctic Fox","Fox","Penguin","Snowy Owl","Polar Bear","Baby Penguin","Arctic Hare","Seal","Walrus","Walrus","Fairy","Drink Me","Alice"]},Panther:{maxLife:35,deckBlooks:["Panther","Panther","Tiger","Orangutan","Owl","Raccoon","Cow","Baby Penguin","Penguin","Kitten","Puppy","Witch","Dormouse"]},Rabbit:{maxLife:41,deckBlooks:["Rabbit","Rabbit","Hamster","Arctic Hare","Baby Penguin","Raccoon","Fox","Puppy","White Rabbit","Squirrel","Cheshire Cat"]},Orangutan:{maxLife:48,deckBlooks:["Orangutan","Orangutan","Orangutan","Orangutan","Orangutan","Orangutan","Orangutan","Orangutan","King of Hearts"]},Witch:{maxLife:65,deckBlooks:["Witch","Witch","Wizard","Wizard","Fairy","Dragon","White Rabbit","Caterpillar","Turtle","Owl","Snowy Owl","Horse"]},"Slime Monster":{maxLife:73,deckBlooks:["Slime Monster","Slime Monster","Bear","Walrus","Tiger","Hedgehog","Wizard","Dragon","Dormouse","Queen of Hearts"]},Dragon:{maxLife:67,deckBlooks:["Dragon","Dragon","Jester","Wizard","Elf","Moose","Jaguar","Tiger","Dormouse","Queen of Hearts","Eat Me"]},"Gingerbread Man":{maxLife:63,deckBlooks:["Gingerbread Man","Gingerbread Man","Snow Globe","Holiday Gift","Hot Chocolate","Holiday Wreath","Gingerbread House","Gingerbread House","Snowy Owl","Penguin","Cheshire Cat","Walrus","Polar Bear"]},Elf:{maxLife:56,deckBlooks:["Elf","Elf","Fairy","Slime Monster","Dragon","Anaconda","Turtle","Capuchin","Witch","Two of Spades","Wizard","White Rabbit"]},Jester:{maxLife:58,deckBlooks:["Jester","Jester","Chick","Parrot","Macaw","Slime Monster","Mad Hatter","Cheshire Cat","Eat Me","Drink Me","Queen of Hearts"]},Alice:{maxLife:54,deckBlooks:["Alice","Alice","Cheshire Cat","Drink Me","Eat Me","Two of Spades","Dormouse","White Rabbit","Unicorn","Parrot","Macaw","Seal"]},Unicorn:{maxLife:70,deckBlooks:["Unicorn","Unicorn","Witch","Wizard","Dragon","Queen","White Rabbit","Cheshire Cat","Jester","Caterpillar","Snowman","Horse","Jaguar","Tiger","Orangutan"]},"Santa Claus":{maxLife:90,deckBlooks:["Santa Claus","Santa Claus","Snowman","Snowman","Gingerbread Man","Gingerbread Man","Gingerbread House","Holiday Wreath","Hot Chocolate","Holiday Gift","Snow Globe","Penguin","White Rabbit","Eat Me","Walrus"]},King:{maxLife:130,deckBlooks:["King","King","King of Hearts","King of Hearts","Caterpillar","Unicorn","Santa Claus","Jester","Dragon","Elf","Witch","Wizard","Slime Monster","White Rabbit","Cheshire Cat","Alice","Queen","Two of Spades","Fairy"]}},o={small:["Chicken","Pig","Dog","Cat","Bear","Raccoon","Tiger","Parrot","Arctic Fox","Panther","Rabbit","Orangutan"],big:["Witch","Slime Monster","Dragon","Gingerbread Man","Elf","Jester","Alice"],boss:["Unicorn","Santa Claus","King"]},r=function(e,t){return"boss"===e?o.boss